Install & Setup- Luna Simple Security System
Initial Install
In just a few simple steps, your system will be ready to use! The video below walks you through the entire installation process.
If needed, you can also use our step-by-step articles and videos for installing individual sensors. Click here. These are shown below. For camera setup, click Camera Installation.
Once your security system is installed, you can download and install the Alder App on your mobile phone.
Door Sensor Install Guide
Step by Step Guide
If you are adding new equipment to your alarm system, make sure you have already added this Door Sensor to your alarm system before you install this piece of equipment.
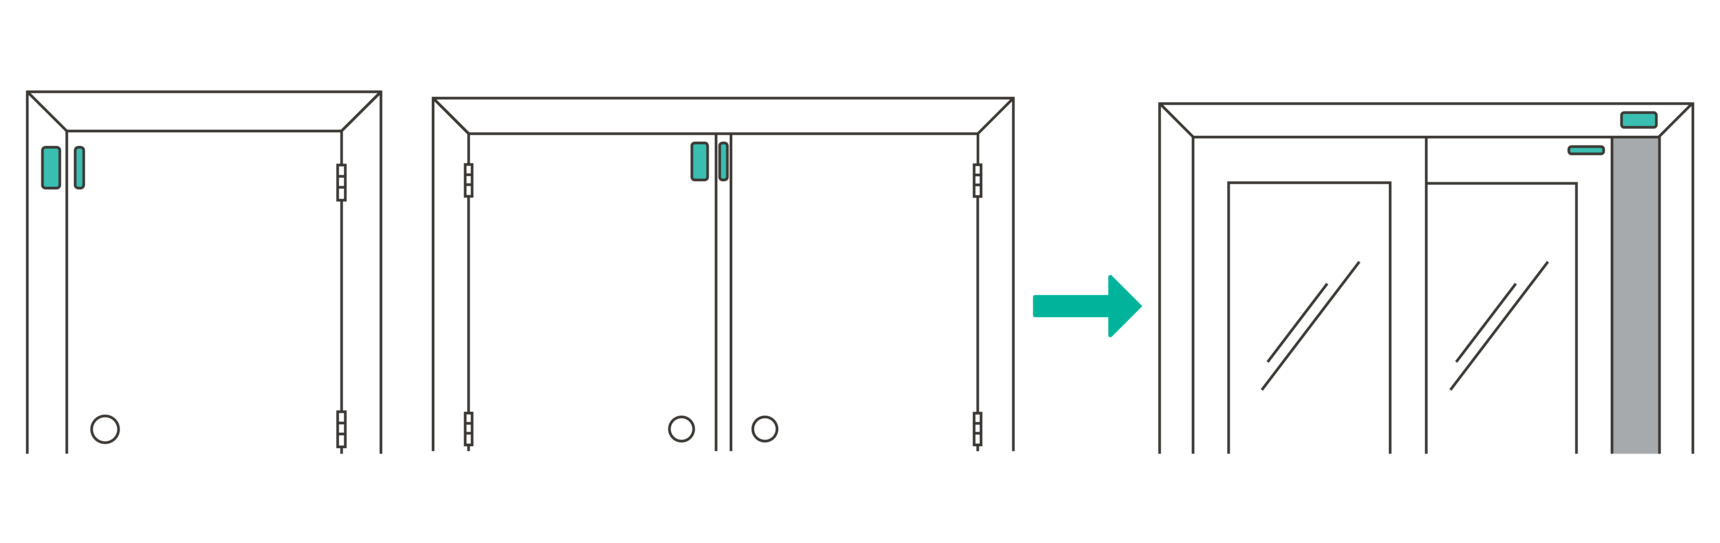
Common Installation Locations
- Swinging Door
- Sliding Door
- Double Door
Avoid
Do not install sensors:
- In a non-climate controlled area
- On the same side as your door hinge
- On a metal or aluminum surface
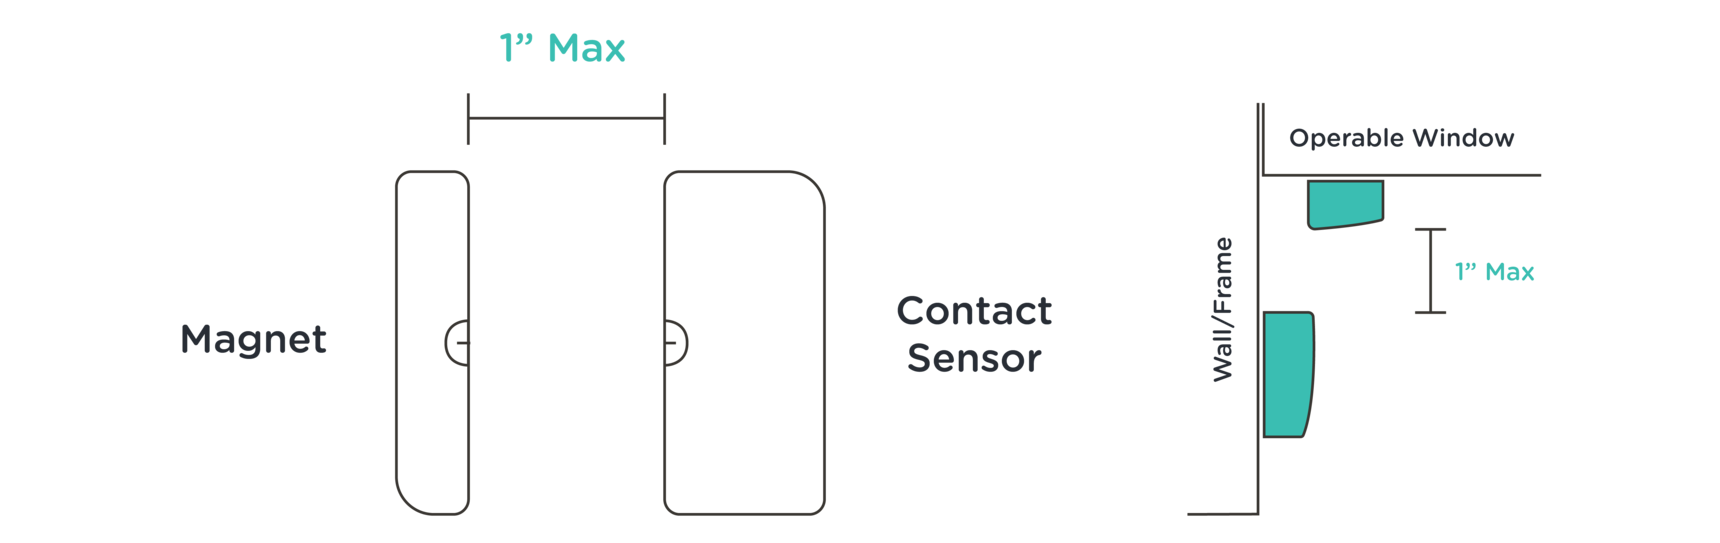
- More than 1" apart
Best Practice
- Swinging door - place the magnet on the door in the top corner opposite the hinges. Place the contact sensor either on the molding above or the molding next to the door.
- Sliding door - place the magnet on the sliding door in the top corner opposite the window. Place the contact sensor either on the molding above or the molding next to the door.
- Double door - place the magnet on the central mullion and the contact sensor on the primary door
- Align the two semi-circles from the contact sensor and magnet with one another
- If you have crown molding or other decorative moldings, it may be better to reverse the sensors (magnet on molding, contact sensor on the door)
- If needed, place either piece at a 90-degree angle as long as the pieces are less than 1" apart

Installing Door Sensor
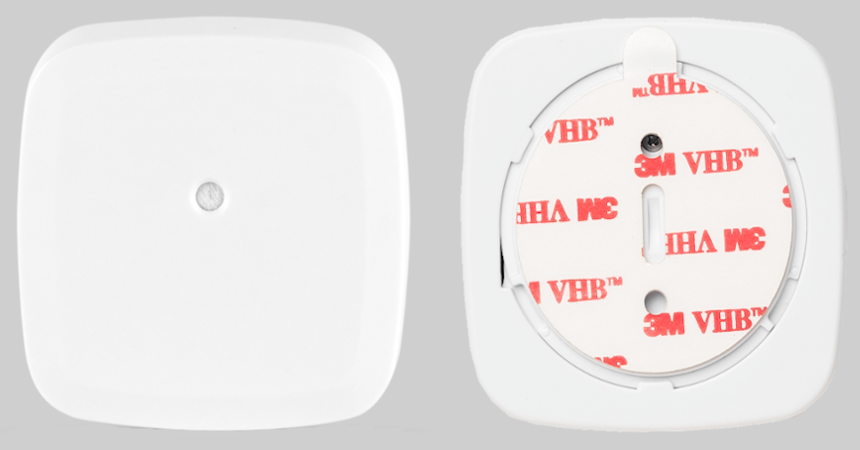
- Consult the user manual included in your packaging for detailed installation, testing, and maintenance instructions
- Clean surfaces of the door and molding before mounting the sensor
- Remove the adhesive backing
- Press firmly and hold in place for 30 seconds
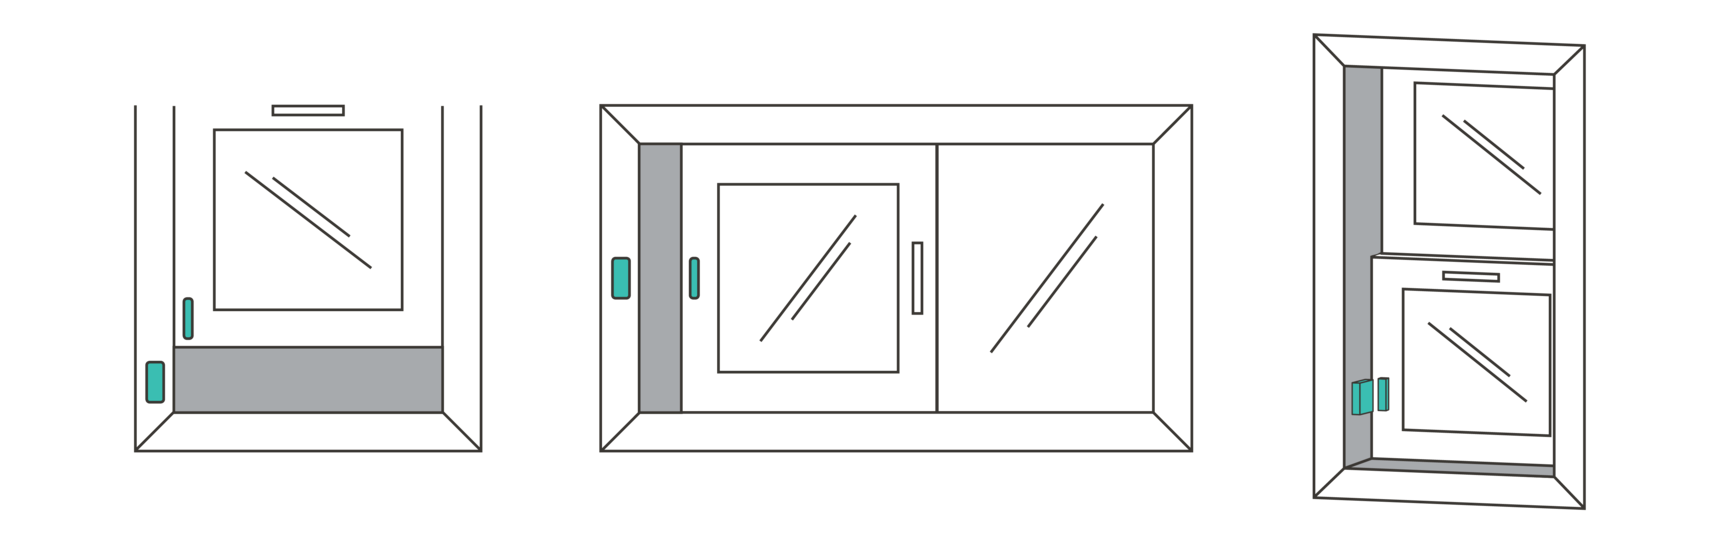
Window Sensor Install Guide
Step by Step Guide
if you are adding new equipment to your alarm system, make sure you have already added this Window Sensor to your alarm system before you install this piece of equipment.
Common Installation Locations
Avoid
Do not install sensors:
- In a non-climate controlled area
- On a metal or aluminum surface
- More than 1" apart
Best Practice
- Place the magnet on the window that opens or slides. Place the contact sensor on the frame.
- Align the two semi-circles from the contact sensor and magnet with one another
- If your window frame is too narrow it might be better to reverse the sensors (magnet on the frame, contact sensor on the window)
- If needed, place either piece at a 90-degree angle as long as the pieces are less than 1" apart
Installing Door Sensor
- Consult the user manual included in your packaging for detailed installation, testing, and maintenance instructions
- Clean surfaces of the window and molding before placing the sensor
- Remove the adhesive backing
- Press firmly and hold in place for 30 seconds
Motion Sensor Install Guide
Step by Step Guide
If you are adding new equipment to your alarm system, make sure you have already added the Motion Sensor to your alarm system before you install this piece of equipment.
Motion sensors have a 90º field of view and detect motion up to 45 feet away. They detect movement across a room or hallway and should be used to secure high traffic areas. To preserve battery life, Motion sensors will become inactive for 3 being triggered and during that time will not trigger again.
Common Installation Locations
- Hallway
- Living-room
- Basement
- Stairway entrance

Avoid
To reduce false alarms, do not install sensors:
- In a non-climate controlled area
- Near or in the way of air vents
- In areas of the home that your pets are most active when you are not home
- Pointing directly at windows
Best Practice
- Sensors are recommended to be aimed at high traffic areas of the home as well as likely entry points
- Corners are the best place to install Motion Sensors but they can also be installed on the flat surface of the wall
- Place the sensor 6-8 feet above the floor (Ideally 7 feet)
- Sensor orientation is critical, pay attention to the "TOP" sticker on the back of the sensor for proper placement

Installing Motion Sensor
- Consult the user manual included in your packaging for detailed installation, testing, and maintenance instructions.
- Make sure the wall surface is clean and dry
- Remove the adhesive backing
- Press firmly and hold in place for 30 seconds
Glass Break Install Guide
Step by Step Guide:
If you are installing new equipment to your alarm system, make sure you have already added this Glass Break Detector to your alarm system before you install this piece of equipment. You may also have received our updated Glass Break detector, which will look like the sensor in the image below.
Common Installation Locations
- In a room with three or more windows
- Within 15 feet of all windows that you want to be protected
Avoid
Avoid installing the sensor in
- A room with sound-dampening objects:
- Heavy drapes/blinds
- Partitions
These and other objects will shorten the effective range of detection.
Best Practices

Installing Glass Break Sensor
- Consult the user manual included in your packaging for detailed installation, testing, and maintenance instructions.
- Remove the adhesive backing
- Press firmly and hold in place for 30 seconds
Carbon Monoxide (CO) Install Guide
Step by Step Guide
If you are adding new equipment to your alarm system, make sure you have already added the Carbon Monoxide Detector to your alarm system before you install the piece of equipment.
Common Installation Locations
- Hallway
- Utility Room
- Rooms with gas appliances
Avoid
Do not install the sensor in the following areas:
- Next to a door or window that would be affected by drafts
- In or below a cupboard
- Outside the home
- Where airflow would be obstructed by curtains or furniture
- Where dirt or dust could collect and block the detector
- Where it could be knocked, damaged, or inadvertently removed
- Within 3 feet of a ceiling fan
- Within 3 feet of an air return
Best Practices
- Within 10 feet of sleeping areas and in bedrooms that contain fuel-burning appliances
- If the appliance or room is not normally used, such as a boiler room, the detector should be placed just outside the room so the alarm can be heard
- Ceiling Mount - place the detector at least 12 inches from any wall (measured from the closest outside edge of the detector). The green area below indicates proper placement.
- Wall Mount - place the detector at least as high as a light switch and at least 6 inches from the ceiling (measured from the closest outside edge of the detector). The green area below indicates proper placement.

Installing the Carbon Monoxide Detector
- Consult the user manual included in your packaging for detailed installation, testing, and maintenance instructions.
- Remove the adhesive backing
- Press firmly and hold in place for 30 seconds
Smoke Heat Freeze Install Guide
Step by Step Guide
If you are adding new equipment to your alarm system, make sure you have already added the Smoke Heat Freeze Detector to your alarm system before you install the piece fo equipment.
Common Installation Locations
- Bedroom
- Hallway
- Main Living Spaces
Avoid
Do not install Smoke Heat Freeze Detectors in the following areas:
- Within 10 feet of any cooking appliance
- Next to a door or window that would be affected by drafts
- In or below a cupboard
- Outside the home
- Where airflow would be obstructed by curtain, partition or furniture
- Within 3 feet of a ceiling fan
- Within 3 feet of an air return
- Within 3 feet of a bathroom with a shower/bath
- Where dirt or dust could collect and block the detector
- Unfinished rooms (attics / crawl spaces)
- Where it could be knocked, damaged or inadvertently removed
Best Practice
- The detectors should only be mounted in climate-controlled areas.
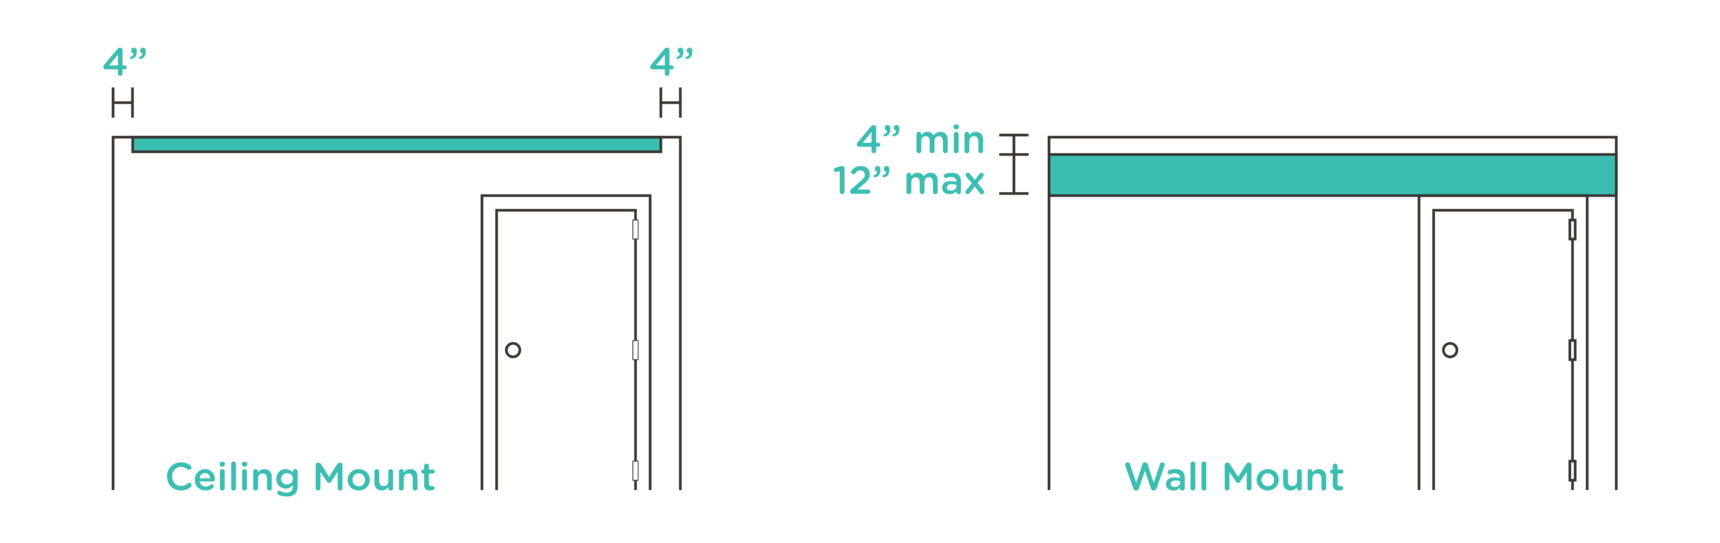
- Ceiling Mount - place the detector no closer than 4 inches to any wall (measured from the closest outside edge of the detector). The green area below indicates the proper placement.
- Wall Mount - place the detector no more than 12 inches from the ceiling but no closer than 4 inches (measured from the closest outside edge of the detector). The green area below indicates the proper placement.
Installing Smoke Heat Freeze Detector
- Consult the user manual included in your packaging for detailed installation, testing, and maintenance instructions
- Remove the adhesive backing
- Press firmly and hold in place for 30 seconds
Flood & Freeze Install Guide
Step by Step Guide
If you are adding new equipment to your alarm system, make sure you have already added this Flood/Freeze Sensor to your alarm system before you install this piece of equipment.
Common Installation Locations
- Behind a toilet
- Under a sink
- Under a fridge
- Beside or behind a washing machine
- Near a water heater
- In a basement
Avoid
- Avoid placing in a location where a child can easily access the sensor
- Do not place on metallic surfaces or aluminum trays
- Do not place where water can condense on the sensor
Installing Flood Sensor
Place the Flood/Freeze sensor in the desired area as per the recommendations listed above with the four copper contacts facing down.
Using Flood/Freeze Sensor
The Flood/Freeze sensor is designed to detect pooling water as it makes contact across the copper contacts on the bottom of the sensor. It also detects temperatures below 41 degrees that could cause water pipes to burst. These features are designed to provide early detection in the case of a water leak or freezing temperatures.
Key Remote Install Guide
Adding Remote
- Click "Settings" on the top right-hand corner of the panel touch screen
- Click "Sensors"
- Click Remotes this will be the last button on the top row
- Click "Add New Sensor"
- Trigger the Remote by pressing and holding any button for three seconds (The panel will indicate the sensor has successfully been added)
- Press Continue
- Select the name of the Remote
- Select Next
If you have additional Remotes to add select "Add more Remotes" otherwise select "Done Adding Remotes"